There are many different areas where generative artificial intelligence (AI) -enabled tools can be useful for learning and development projects. For an instructional designer with limited graphic design experience or abilities, AI can help reduce course development time and generate project cost savings. But ultimately, how do you decide which AI tool to use? Or when to use it? And how well does it actually work? This article describes how to effectively add an AI graphics tool into your learning & development (L&D) graphics production workflow.
First, Consider The Graphic Design Role A Collection Of Interconnected, Modular Skills
There is a broad continuum of talent in our industry. Many instructional designers are equally effective graphic designers, while others have far less experience or training in that arena. But the two practices actually have many similarities, because they both:
incorporate communication directly (e.g. listening effectively and asking the right questions to amass useful input)
are outcome-oriented (e.g. envisioning the end goal first, to determine the best process to employ)
require technical acumen (e.g. utilizing digital tools to capture information and transform it into a better format)
have specialization (e.g. medium-based distinctions vs industry-based distinctions)
consistently look for opportunities to become more efficient and effective (e.g. employing continuous improvement)
Put simply, graphic designers take all of the information available from brand standards, subject matter content, micro-learning goals, macro-learning objectives, and client preferences, then we employ a professional workflow that creates assets or helps align materials visually to reduce learner cognitive dissonance. Examples of some key skills that graphic designers develop over many years fall within the social, creative, or technical spectrum. These include:
Organization
Software Operation
Layout and Composition
Drawing or Illustration
Photography
Color correction
Image Editing
Optimization
Integration
Graphic Design Generalist or Specialist?
A graphic designer might be a proficient illustrator, but work better with a digital stylus instead of drawing by hand. The designer may be poorly organized off the canvas in non-creative tasks, but extremely good at laying out elements on the canvas in their professional role. Or maybe the designer is an excellent photographer (capturing images) but novice to intermediate editor (retouching images).
All of us have areas we are stronger in, based on previous experience and how much time we’ve invested in honing our craft. That unique combination of modular experience and skill is brought to bear every time we work on a project. Frequently graphic designers either hone their skill set in a focused direction to become a specialist, or they expand their knowledge and competency across many areas as a generalist.
Comparatively, there are instructional designers who are stronger in analysis versus course development, or vice versa. And some instructional designers are good at both, working as generalists.
Some software developers are strong in front-end design, rather than back-end database administration or architecture. Some are the other way around, and even others are full-stack, or generalists.
But in the world of AI, there is no tool that actually performs as a generalist. AI tools should only be considered specialists, and dedicated to a narrow task.
Learning & Development Graphic Design Workflows
Effective graphic designers use a systemic approach to their role. These approaches are frequently summarized into a workflow terminology, requiring the designer to employ a combination of skills, like drawing, layout, and image editing, to achieve the end result desired.
Each of these skills involves developing expertise in how to economically harness a production tool to extend the designer’s physical abilities. Some examples of production tools in which I have 20 years of experience using include:
Adobe Illustrator
for drawing
Adobe InDesign
for layout
and Adobe Photoshop
for image editing
In each of these production tools, there are frequent software updates that add new features to supplement older ones. Sometimes it is about adding a new way to manipulate text or objects. Others are incorporating new file type handling. And still others are about speeding up a task flow within the tool. For example, Adobe Photoshop introduced a generative AI fill tool to help with easier subject cut outs, and with extending visual pattern backgrounds for better fit sizing of images.
However, there are many alternatives available to these mentioned. And ultimately, it doesn’t matter what tool you use because this is really all about achieving your purpose in-budget and on schedule, without violating any copyright or legal usage protections. AI can help with that, when done right. So here is what to consider so you can get started.
Here Is How AI-Enabled Graphics Tools Can Help Replace Experience
One of the things many people misunderstand about AI is what it can and cannot do well. There is a public perception that it may replace some jobs or make them irrelevant. Some folks think that somehow you can push a button, and voila: you have a blog post. Or a photograph. Or a PowerPoint slide. Although it is unclear what the future will hold, there is no technology (yet) that can perfectly perform the translation of what you say or think that you want into the end result. To do it right, you have to start with a clear understanding of why you are using the tool.
Because these tools actually require quality input to provide quality output. Otherwise, it’s a garbage in, garbage out situation. So at a minimum, to use AI graphics tools to the best of their capabilities, you need to learn a skill yourself: effective prompting. That involves reading up on how to ask a question in the right syntax, then applying that knowledge with the right tool that will generate what you need. Yep - training first, then research. Fortunately, there are courses online to learn how to do this, but of course, you can also just dive in and try out different tools. Practice makes perfect!
Do a quick search for “AI graphics” on Duck Duck Go, Google, Bing, or another search engine, and you be served with hundreds of websites. That’s what I did when I was writing this article, because although I have a lot of expertise in graphics already, I was curious to see what would come up through my search. In your search engine results page (SERP), you will see everything from graphics cards to free tools, and blog articles to lists. Now do a search for “AI graphics tool online free” and you will see better results.
This quick exercise is to show how your refined prompt into a search engine will get you closer to what you need. The same holds true for a prompt-based AI tool, because:
some tools are free
some require a subscription or buying credits
some require a registered account
some do not need text-based prompts
and as noted above, some are built right into other tools you may already be using (e.g. Adobe Photoshop or Articulate Storyline)
To gain the most value from AI graphics tools, start by identifying one skill area you may not be strong in. Or one skill area where you would like to gain speed benefits. Then try out several tools that are tailored to that area within your existing workflow to gain some practical experience. You will quickly find out what works, what doesn’t, and what adjustments you can make to gain the best possible output. For the purposes of this article, I am demonstrating one tool that I have used to save time.
When To Involve AI Graphics Tools WHEN YOU ARE ALREADY EFFECTIVE AT GRAPHIC DESIGN
Even with my expertise, it isn’t always economical for me to generate everything from scratch. There are some situations when a photo or video shoot is necessary to produce high quality photography that depicts exactly what I need. But more frequently, composites of stock photos or videos can bridge the gap, because there are so many different raw material solutions available. Many of these material sources also have AI search tools, modifications before download, and other ways to speed up the process of reaching the right-fit asset.
As an artist, I feel a lot of satisfaction in touching everything to realize my vision. But experience teaches that time is finite, budgets are tight, and this is a collaboration medium. So if you are equally strong at visual design, consider what elements of the development process are less poignant or valued, and consider trading time saved with AI for more time on the things you care about more.
Using AI Graphics Tools Within A Common Learning & Development Graphics Workflow
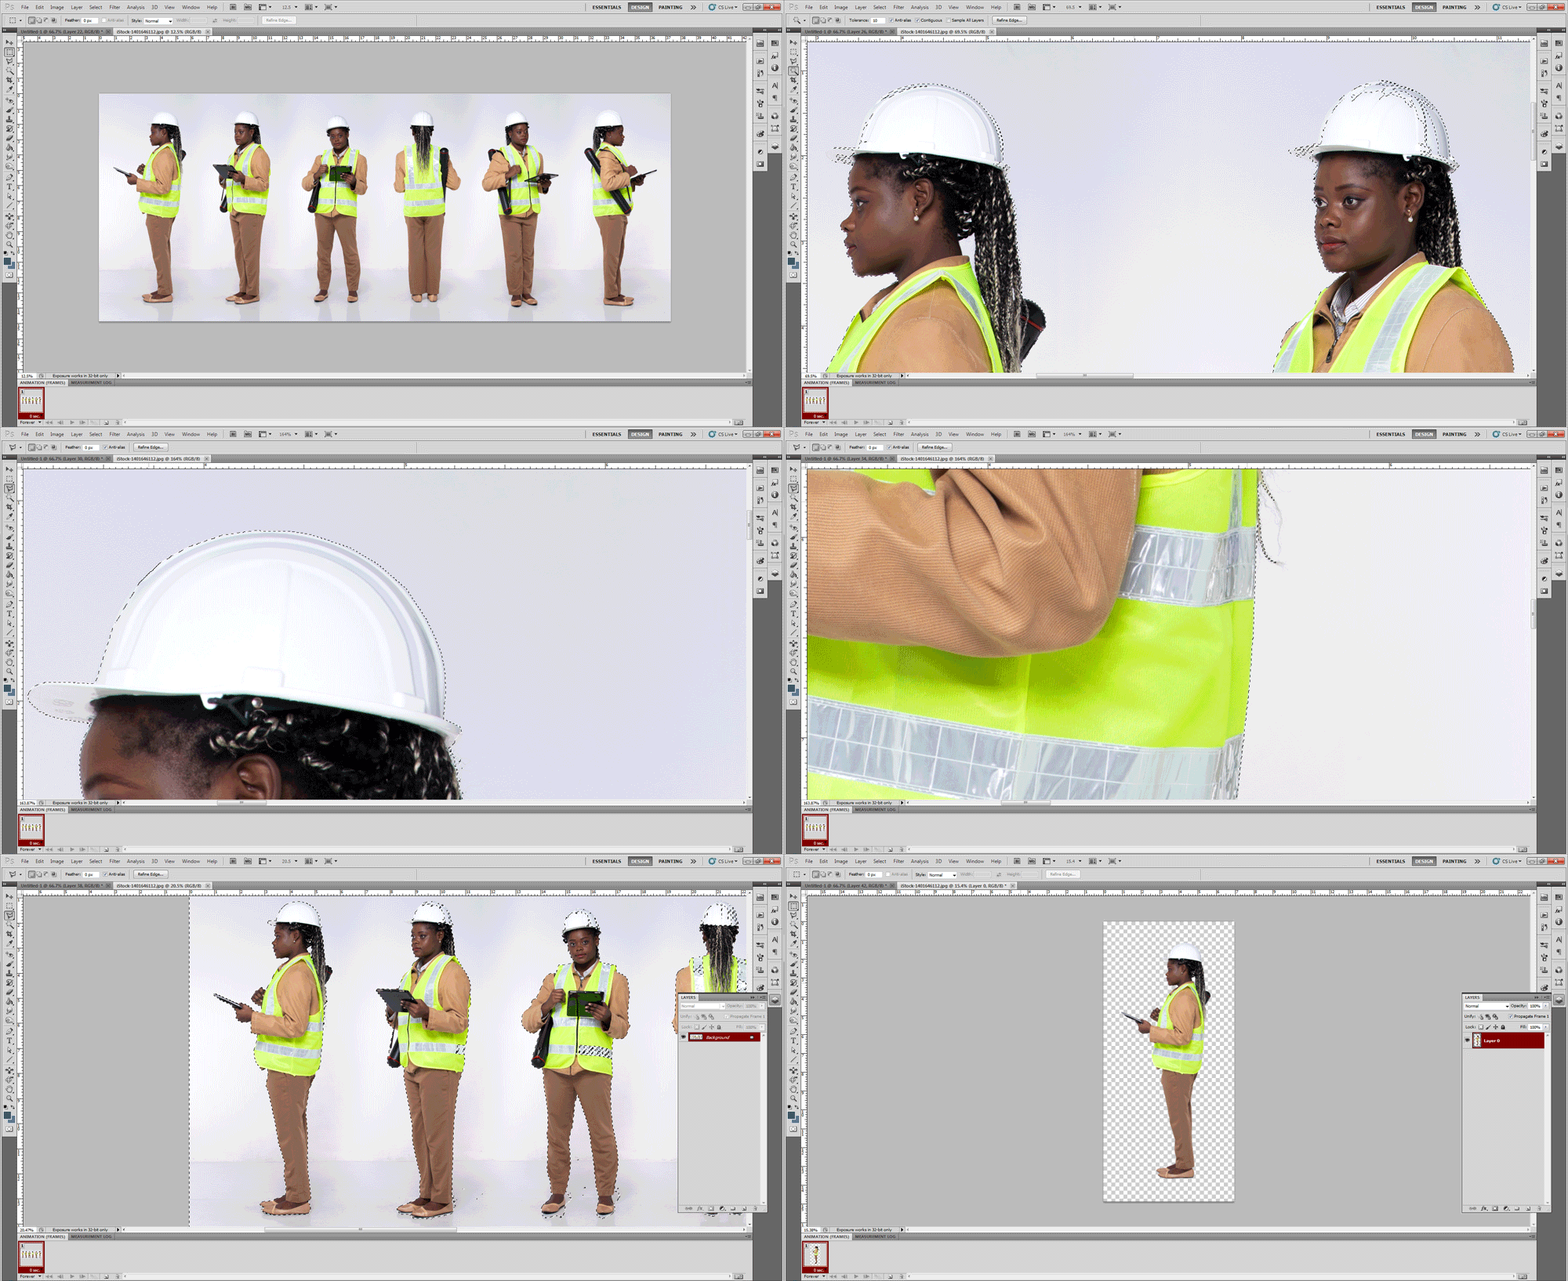
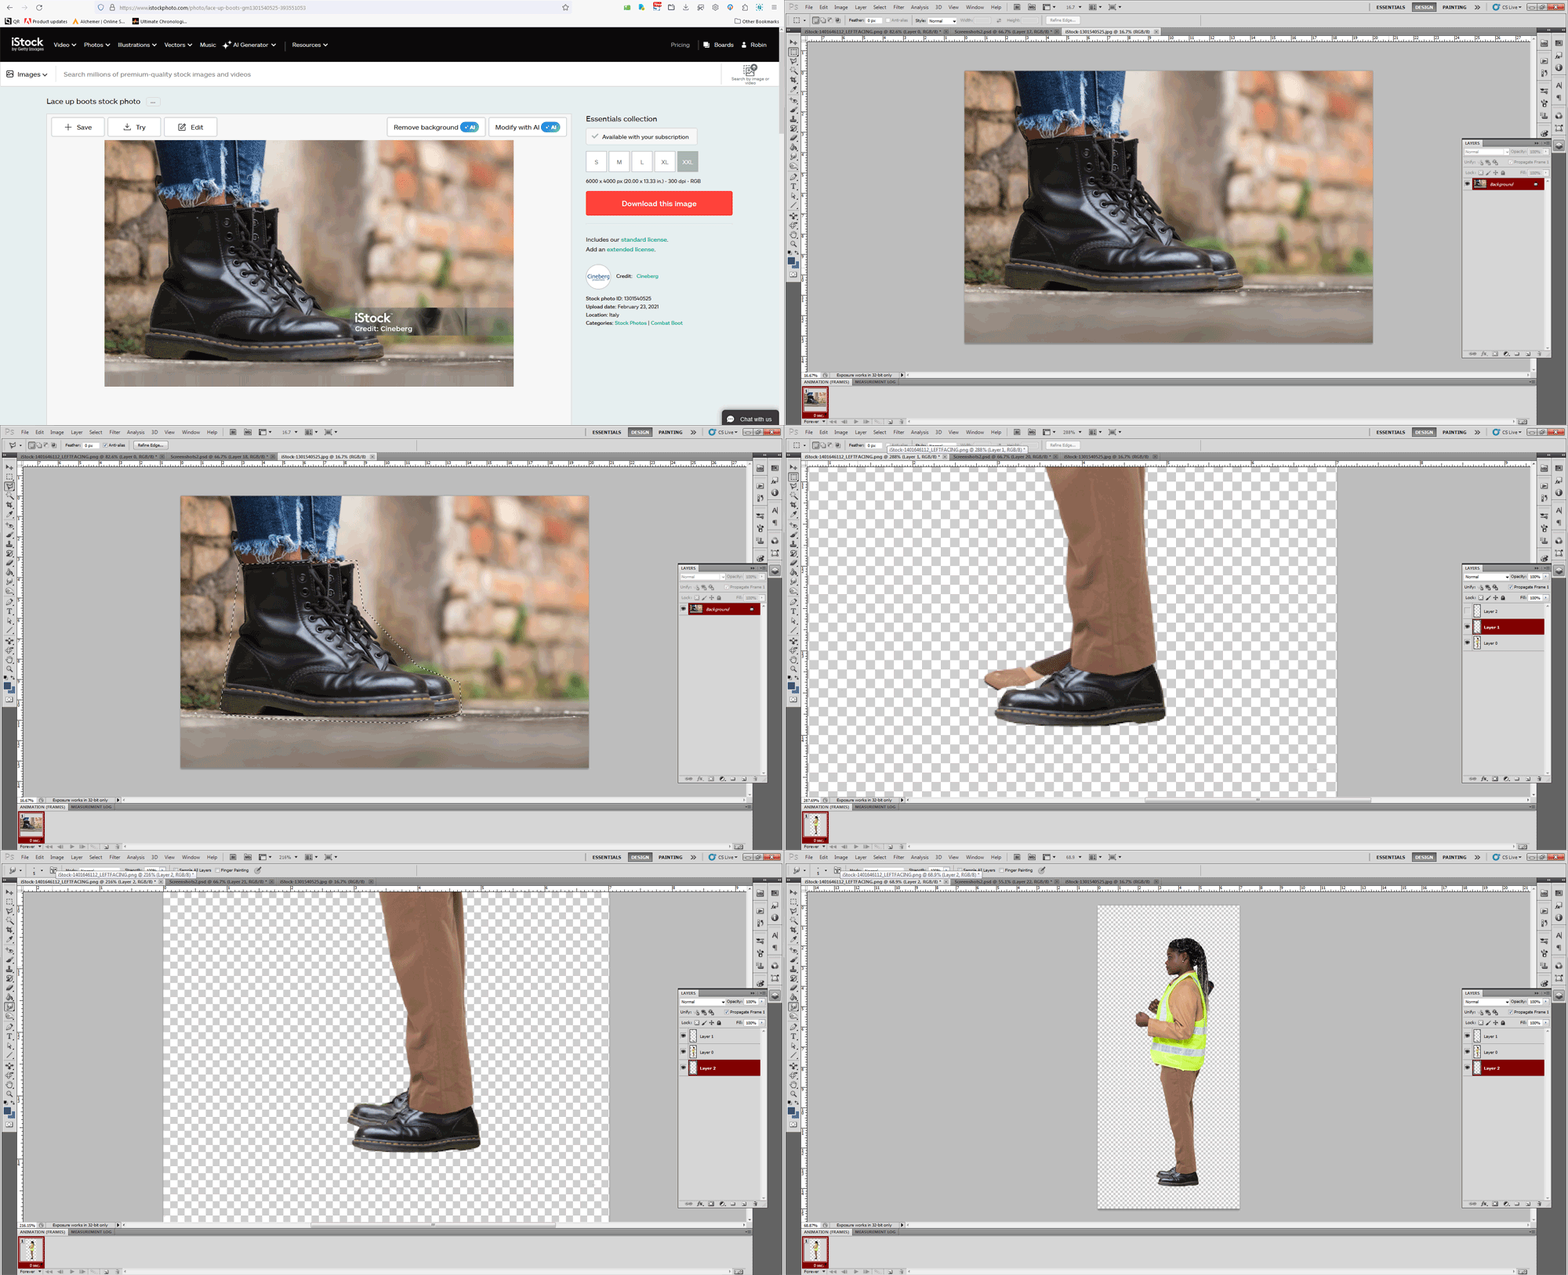
One common demand for learning & development graphics includes generating agents or characters who represent the learner audience. Change by Design was hired to build new hire onboarding coursework for an automotive manufacturer’s new warehouse and product distribution facility. Our instructional designers requested two model characters, which should be photo-realistic figures taken from photography (male and female), then posed in two perspectives: full front and profile view.
1 - Select Raw Assets From a Stock Photography Vendor
The team provided me with descriptors of the characters and verified stock photos are acceptable. In this situation you can start by performing keyword searches on royalty-free websites like Unsplash and Pexels to find a raw image that will meet the need. If you can’t find something close, then you can do the same search on subscription sites like iStockphoto, Shutterstock, and Adobe Stock, which should hopefully do the trick.
For this example project, I performed my search on iStock and was able to find them fairly quickly. Then I was presented with the option to perform modifications and cutout before downloading. The price to use those built-in AI functions was $24.99 with some form of unlimited use. But because of my similar speed to personally perform the tasks, I would have actually needed to slow down to use the built-in tool. So I didn’t.
Instead, I simply located them on iStock and downloaded the high resolution versions directly, without any initial modifications. However, I believe it might be very useful for someone who didn’t have as much experience modifying images within Adobe Photoshop or Canva to use the built-in tool.
2 - Modify Assets Using an ONLINE Vendor’s Built-in AI Graphics Tool OR A LOCAL APPLICATION
As mentioned in the previous step, many of these asset sources now offer AI-enabled functionality at a price. This includes things like color changes, resizing or cropping, object removal, subject cut out, object editing, object replacement, and actual compositing. For the sake of simplicity in this example, I’ll stick to describing simple changes, which AI can do relatively well (e.g. changing this color to that color). Because remember: there is no such thing as a generalist graphics AI - only specialist graphics AI.
I discussed this some in the previous step, because someone who uses the built-in tool would do it earlier in the workflow, before downloading. But because I didn’t use a built-in iStock feature for the use example in this article, I can’t provide helpful details of its effectiveness. Just remember that after you have found a suitable image (like the one above) you have to decide whether to modify it before downloading, or making changes after the fact. Now here is the key point at this stage: how do you ensure consistent edits between drafts?
If you use built-in AI features on an image once, then have to come back later, you may not be able to repeat the same treatment because of the tool’s algorithms. AI tools change as their learning model is fed new data over time. I’ve found that many clients or employers are fickle, asking for changes that require a kind of modification chain-of-custody, with steps easily documented and adjusted at intermediate points. Things like color balance, filtering, target orientation, and element integration all have to be considered. As a result, I will typically download the asset as-is to start, at the highest resolution possible. That way, if something does change mid stream, I can quickly work my way back to the original version and eliminate any inefficiency that would come from repeating unnecessary steps.
So there are two parts to this: the function, then the proofing. The function is fast – do this. The proofing takes longer, because you have to review it, confirm if it is what you want, then finalize. If I am doing a color replacement in Adobe Photoshop, I simply select Adjustments > Selective Color, mark “preview,” then make my change. Easy-peasy, and fast. Therefore, for me, the AI-enabled portion of this workflow doesn’t save a significant amount of time. But for someone with little to no experience with Photoshop, it might be helpful to do it within the asset vendor integration. That’s with the caveat that you may not be able to repeat the same output later on (if a client’s mind changes and you have to make a small tweak) because of AI algorithm changes.
3 - Modify Assets Using a stand-alone Online AI Graphics Tool
In this project example, I downloaded the asset(s) and tried performing the simple edits through an online AI-enabled graphics tool called PIXLR. Unfortunately, I hadn’t prepped the images well enough, which produced unacceptable results. I tried lowering the selection threshold, but the tool left small and large gaps in the selection area, which would require me to go back afterwards to cleanup. And when I increased the threshold, the tool selected portions of the subject I wanted to keep rather than remove.
As a result, I ended up spending 15 minutes performing the 4 cut outs on the original images instead, and didn’t have to go back and find any stray, un-deleted pixels.
Therefore for cut outs, the amount of judgment needed and my experience with Photoshop made it faster to simply do it myself. I think that ultimately, this is due to my own limited experience with the PIXLR tool and its inability to make enough accurate judgments with the prompts I entered.
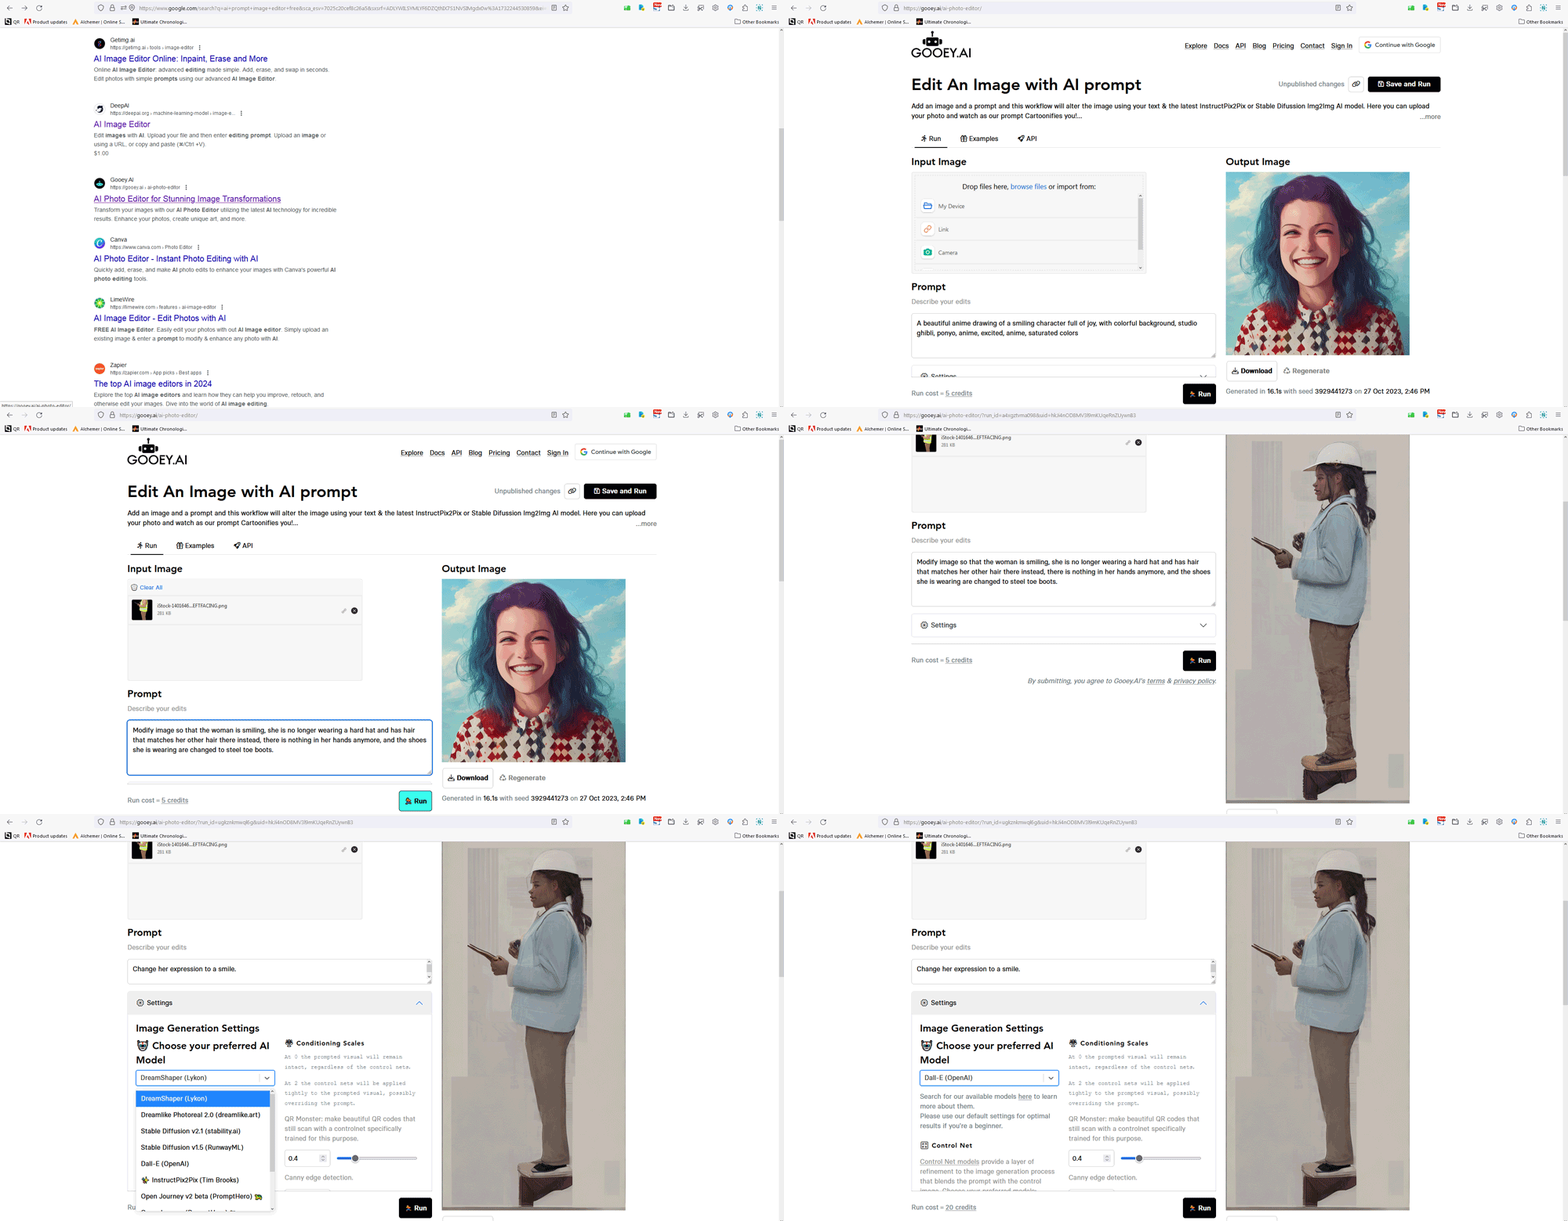
After I completed the cut outs manually, I tried using AI again, but this time to make the image retouch modifications needed. I needed to do things like removing items from the characters’ hands and removing their hard hats before adding back in their hair. Unfortunately, I faced additional questionable results, including the Gooey AI tool giving my character a blue sport coat, the tool replacing my character’s hat with a different one, and the tool generating a reflection of her foot underneath.
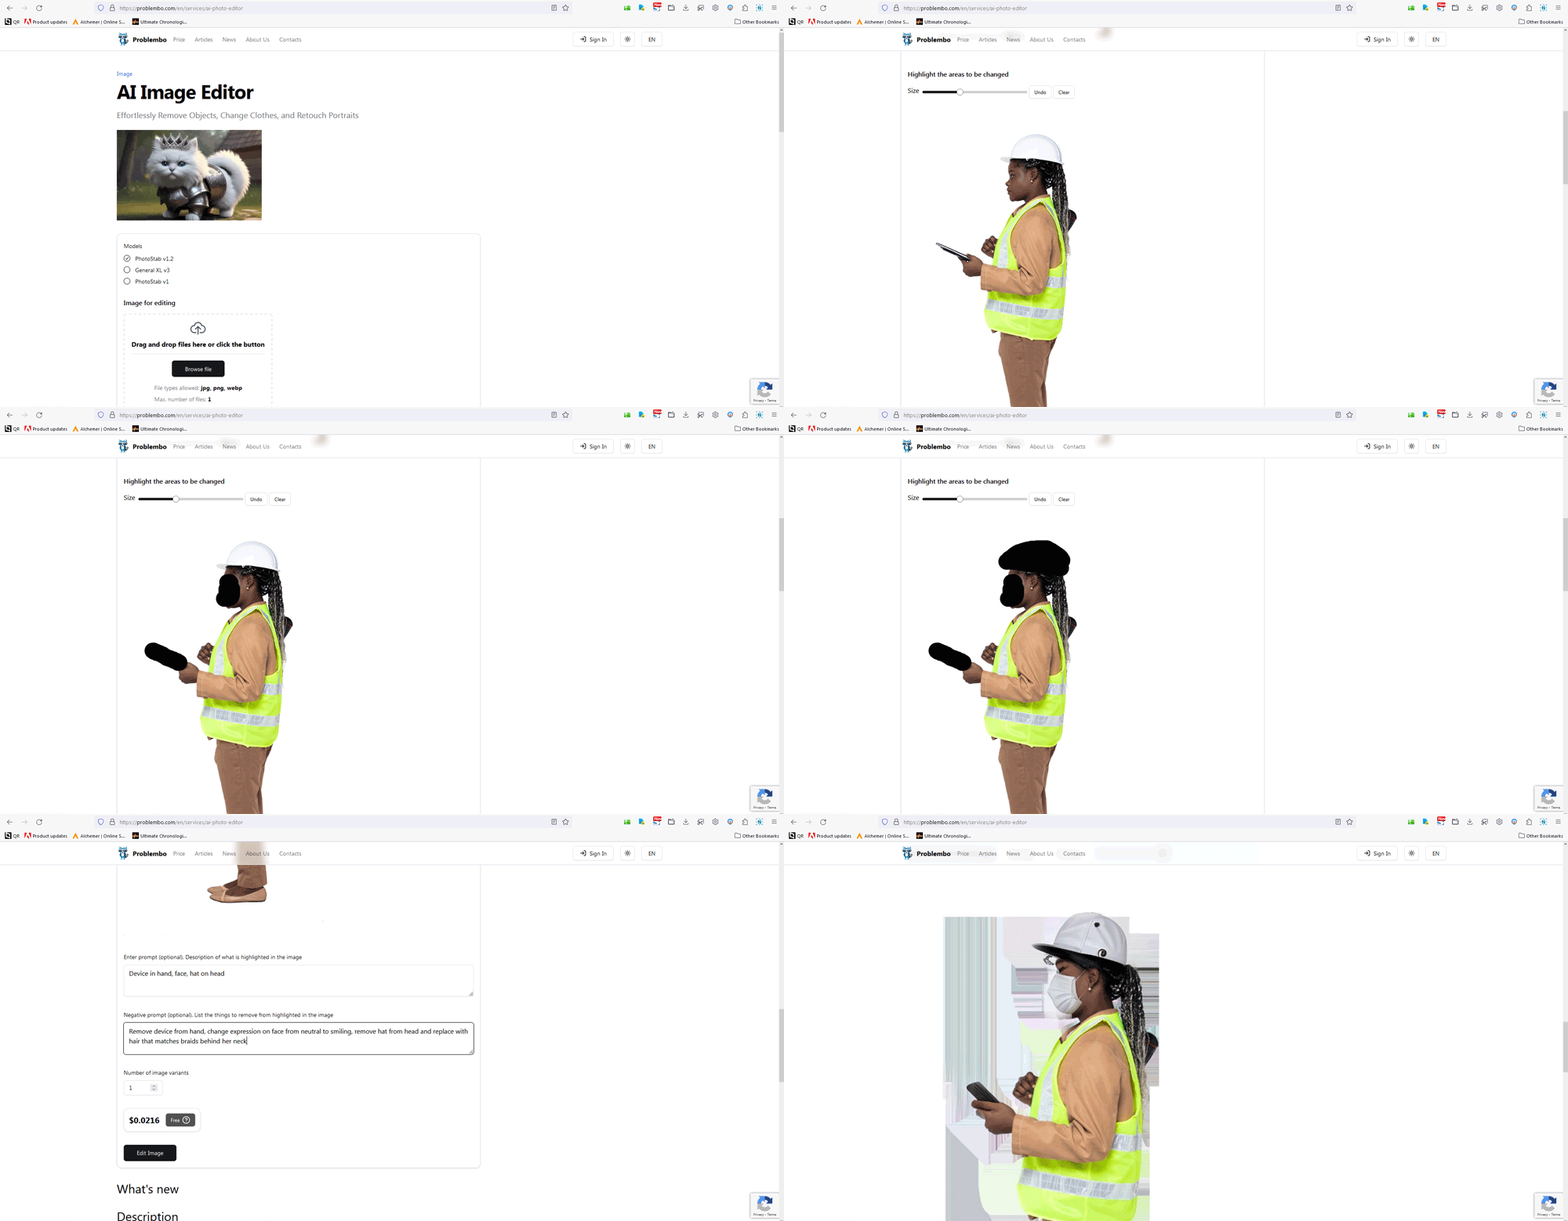
I thought, maybe the issue is with my prompts or the tool itself. So I tried a different one, called Problembo. I uploaded the cut out image, marked the areas for modification, entered prompts for what was marked and what I wanted done, then let it whirl. The issue this time was the tool adding new items to the image, like a mask.
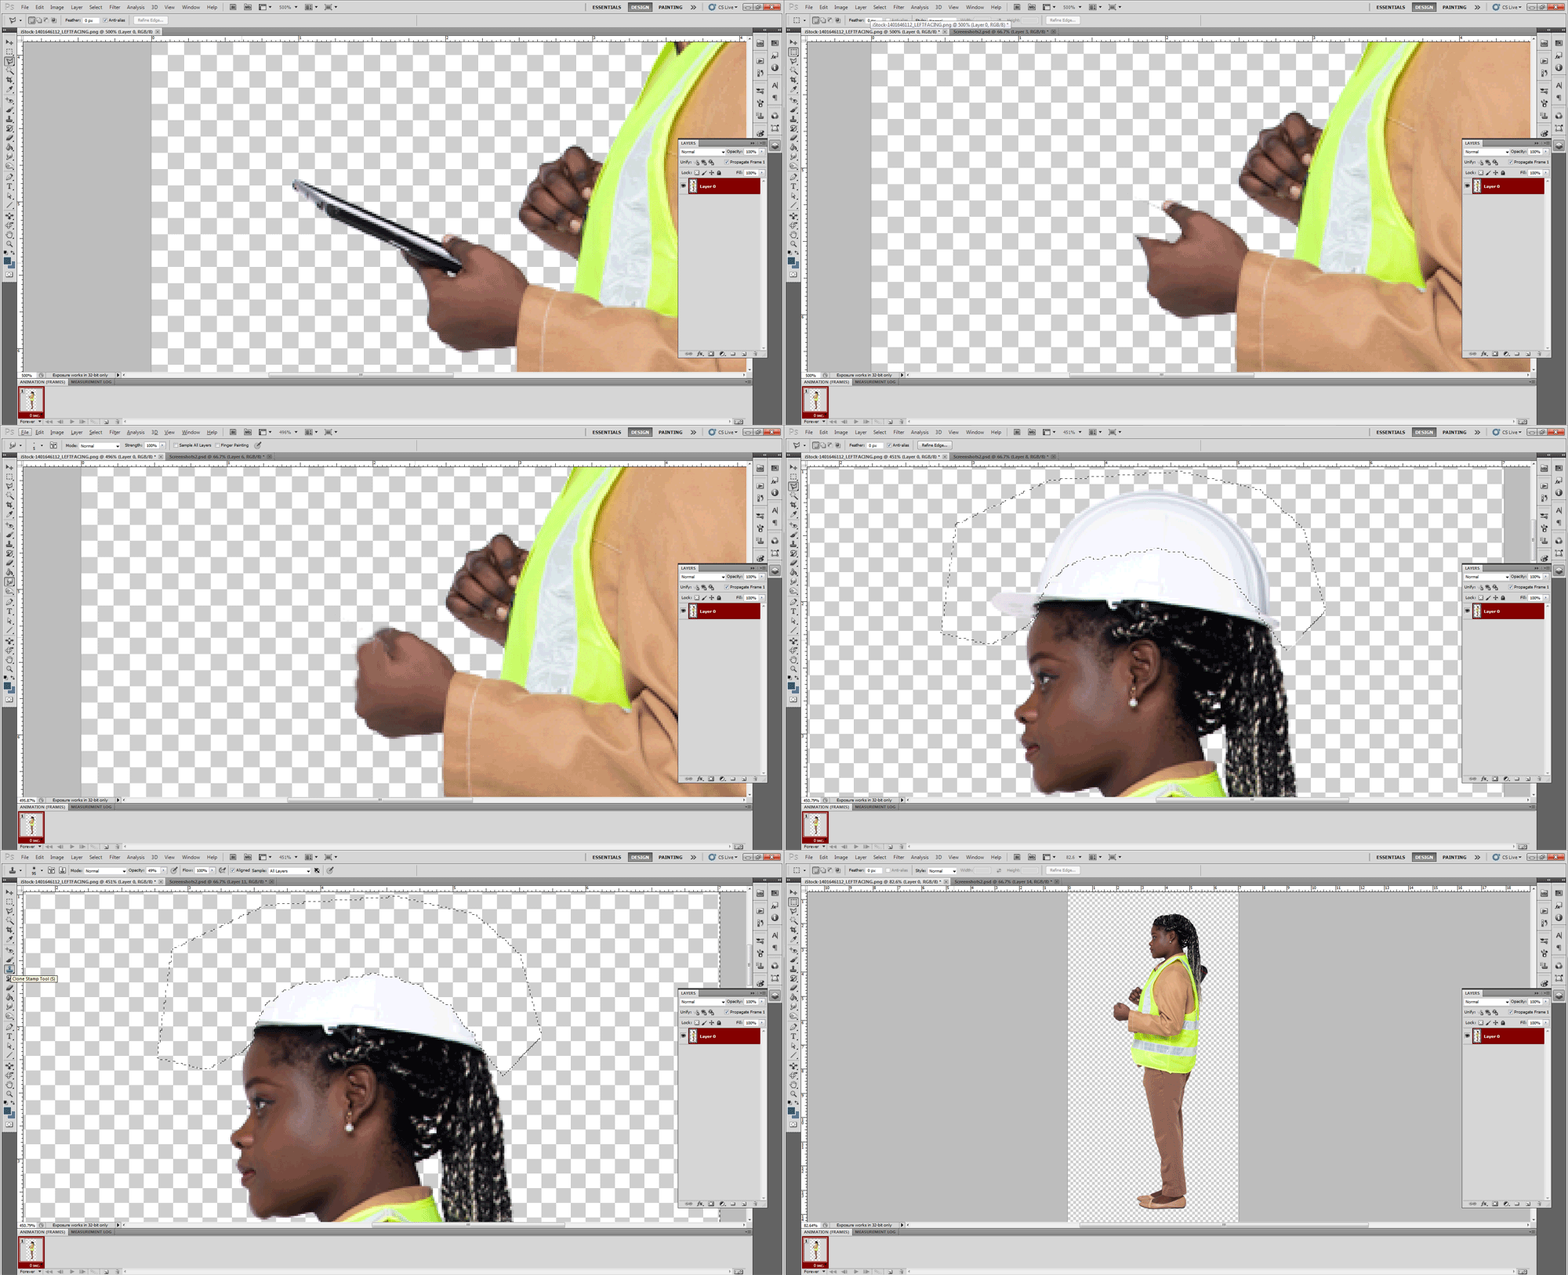
In this part of my workflow, I found out I had really anticipated more from these tools than they could achieve. I was kind of expecting an AI photo retouching generalist, based on the prompts that I added. Alas, I ended up scrapping these weird versions and went back to my existing expertise to modify the images as needed for the hair and hands in Adobe Photoshop.
4 - Modify AND COMPOSITE Assets Using a Locally installed AI Graphics Tool
So up to this point, I had found it faster and more accurate to use my own existing competency to complete the cut outs and retouches to the characters. However, more was needed to get these images to final state, including replacement of footwear with steel toed boots that were appropriate to the warehouse environment.
So I downloaded additional assets from iStock, then cut out the two views I needed for each. With some additional modifications, this took about 15 minutes per character perspective. But I also needed to modify the faces of the characters, so that there would be a neutral and a smiling version of each. Although I could have done it manually, this seemed like a good opportunity to try AI again.
5 - Upload Modified Assets To a specialized Online AI Graphics Tool
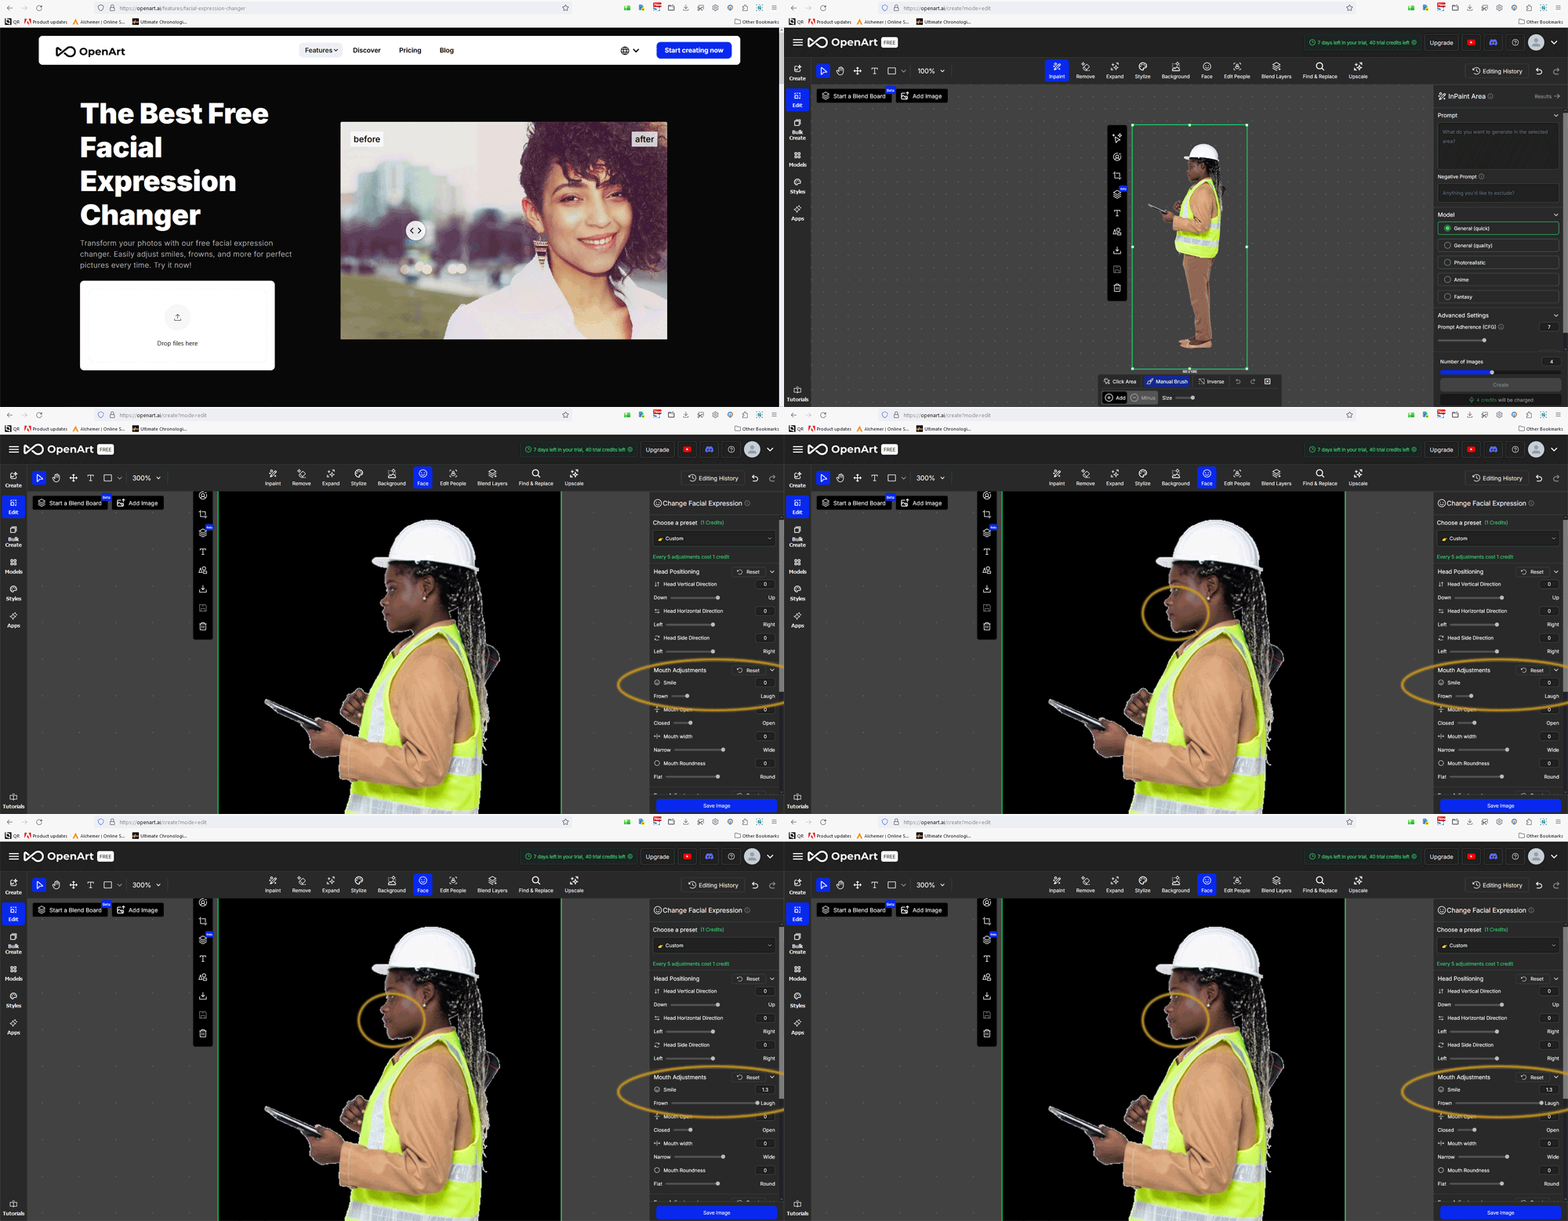
Fortunately, this was the point where graphics AI really shined bright, performing a individual, specialized task. I looked up a tool called OpenArt that was geared toward facial expressions, and uploaded my PNGs. Once they were there in the tool, I selected the right presets for what I was trying to do, then added a smile to each angle.
Using the AI tool was simple, and a matter of 1-2 minutes to get the output I needed without any written prompts. It was really just a matter of adjusting the slider values, then repeating for the other image.
If I made facial modifications to images on a daily basis, I may have been able to match the quality of the tool. But I don’t, so using an AI tool this way, for a very targeted edit, made a lot of sense. This phase took about 5 minutes total to find the right blend of adjustments, from start to finish. And it probably would have been about 15 minutes per perspective if I had done it manually, so I call that a win.
6 - Output Final Assets Optimized For the Target Purpose
Because our target format would be layered visuals on a Microsoft PowerPoint screen, I output PNG files with transparent backgrounds around the cut out figures. The instructional designer I was working with was happy, it fit within our time and budget scale for graphics, and the client was delighted with the result.
Using AI Graphics Tools Outside Of An Established Graphics Workflow
The example above shows different points when AI can be integrated into your graphic design workflow. But there are other visual asset creation tools that can be useful when you haven’t established a specific workflow, or if you just need a quick change. Often, these are referred to as image enhancers, and function in a similar way to the image filter tools on your mobile phone.
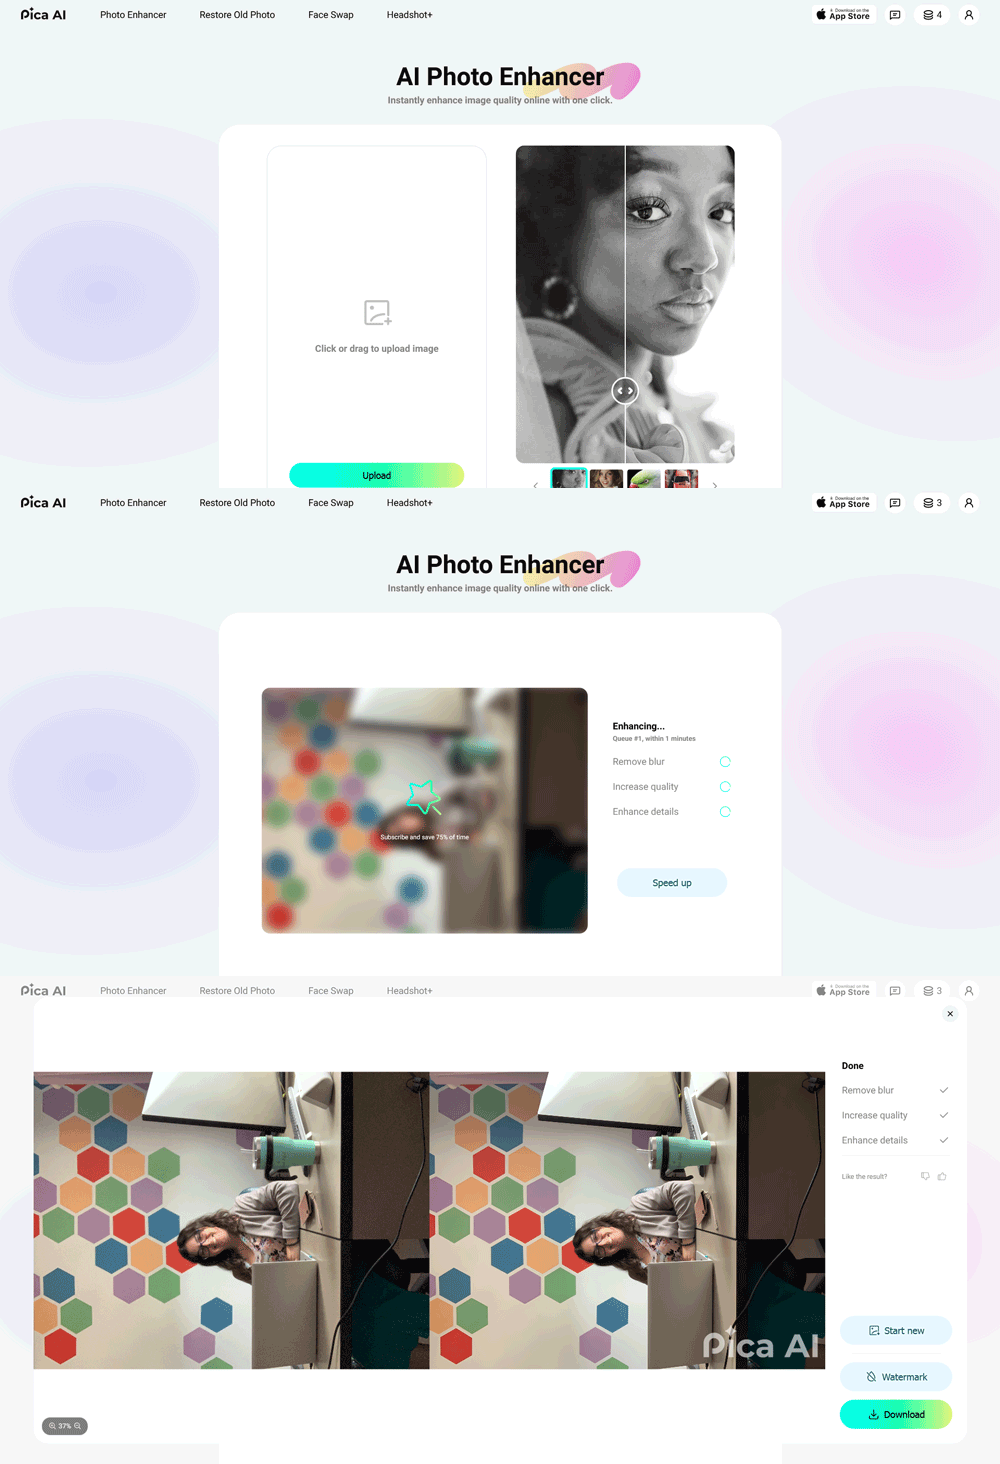
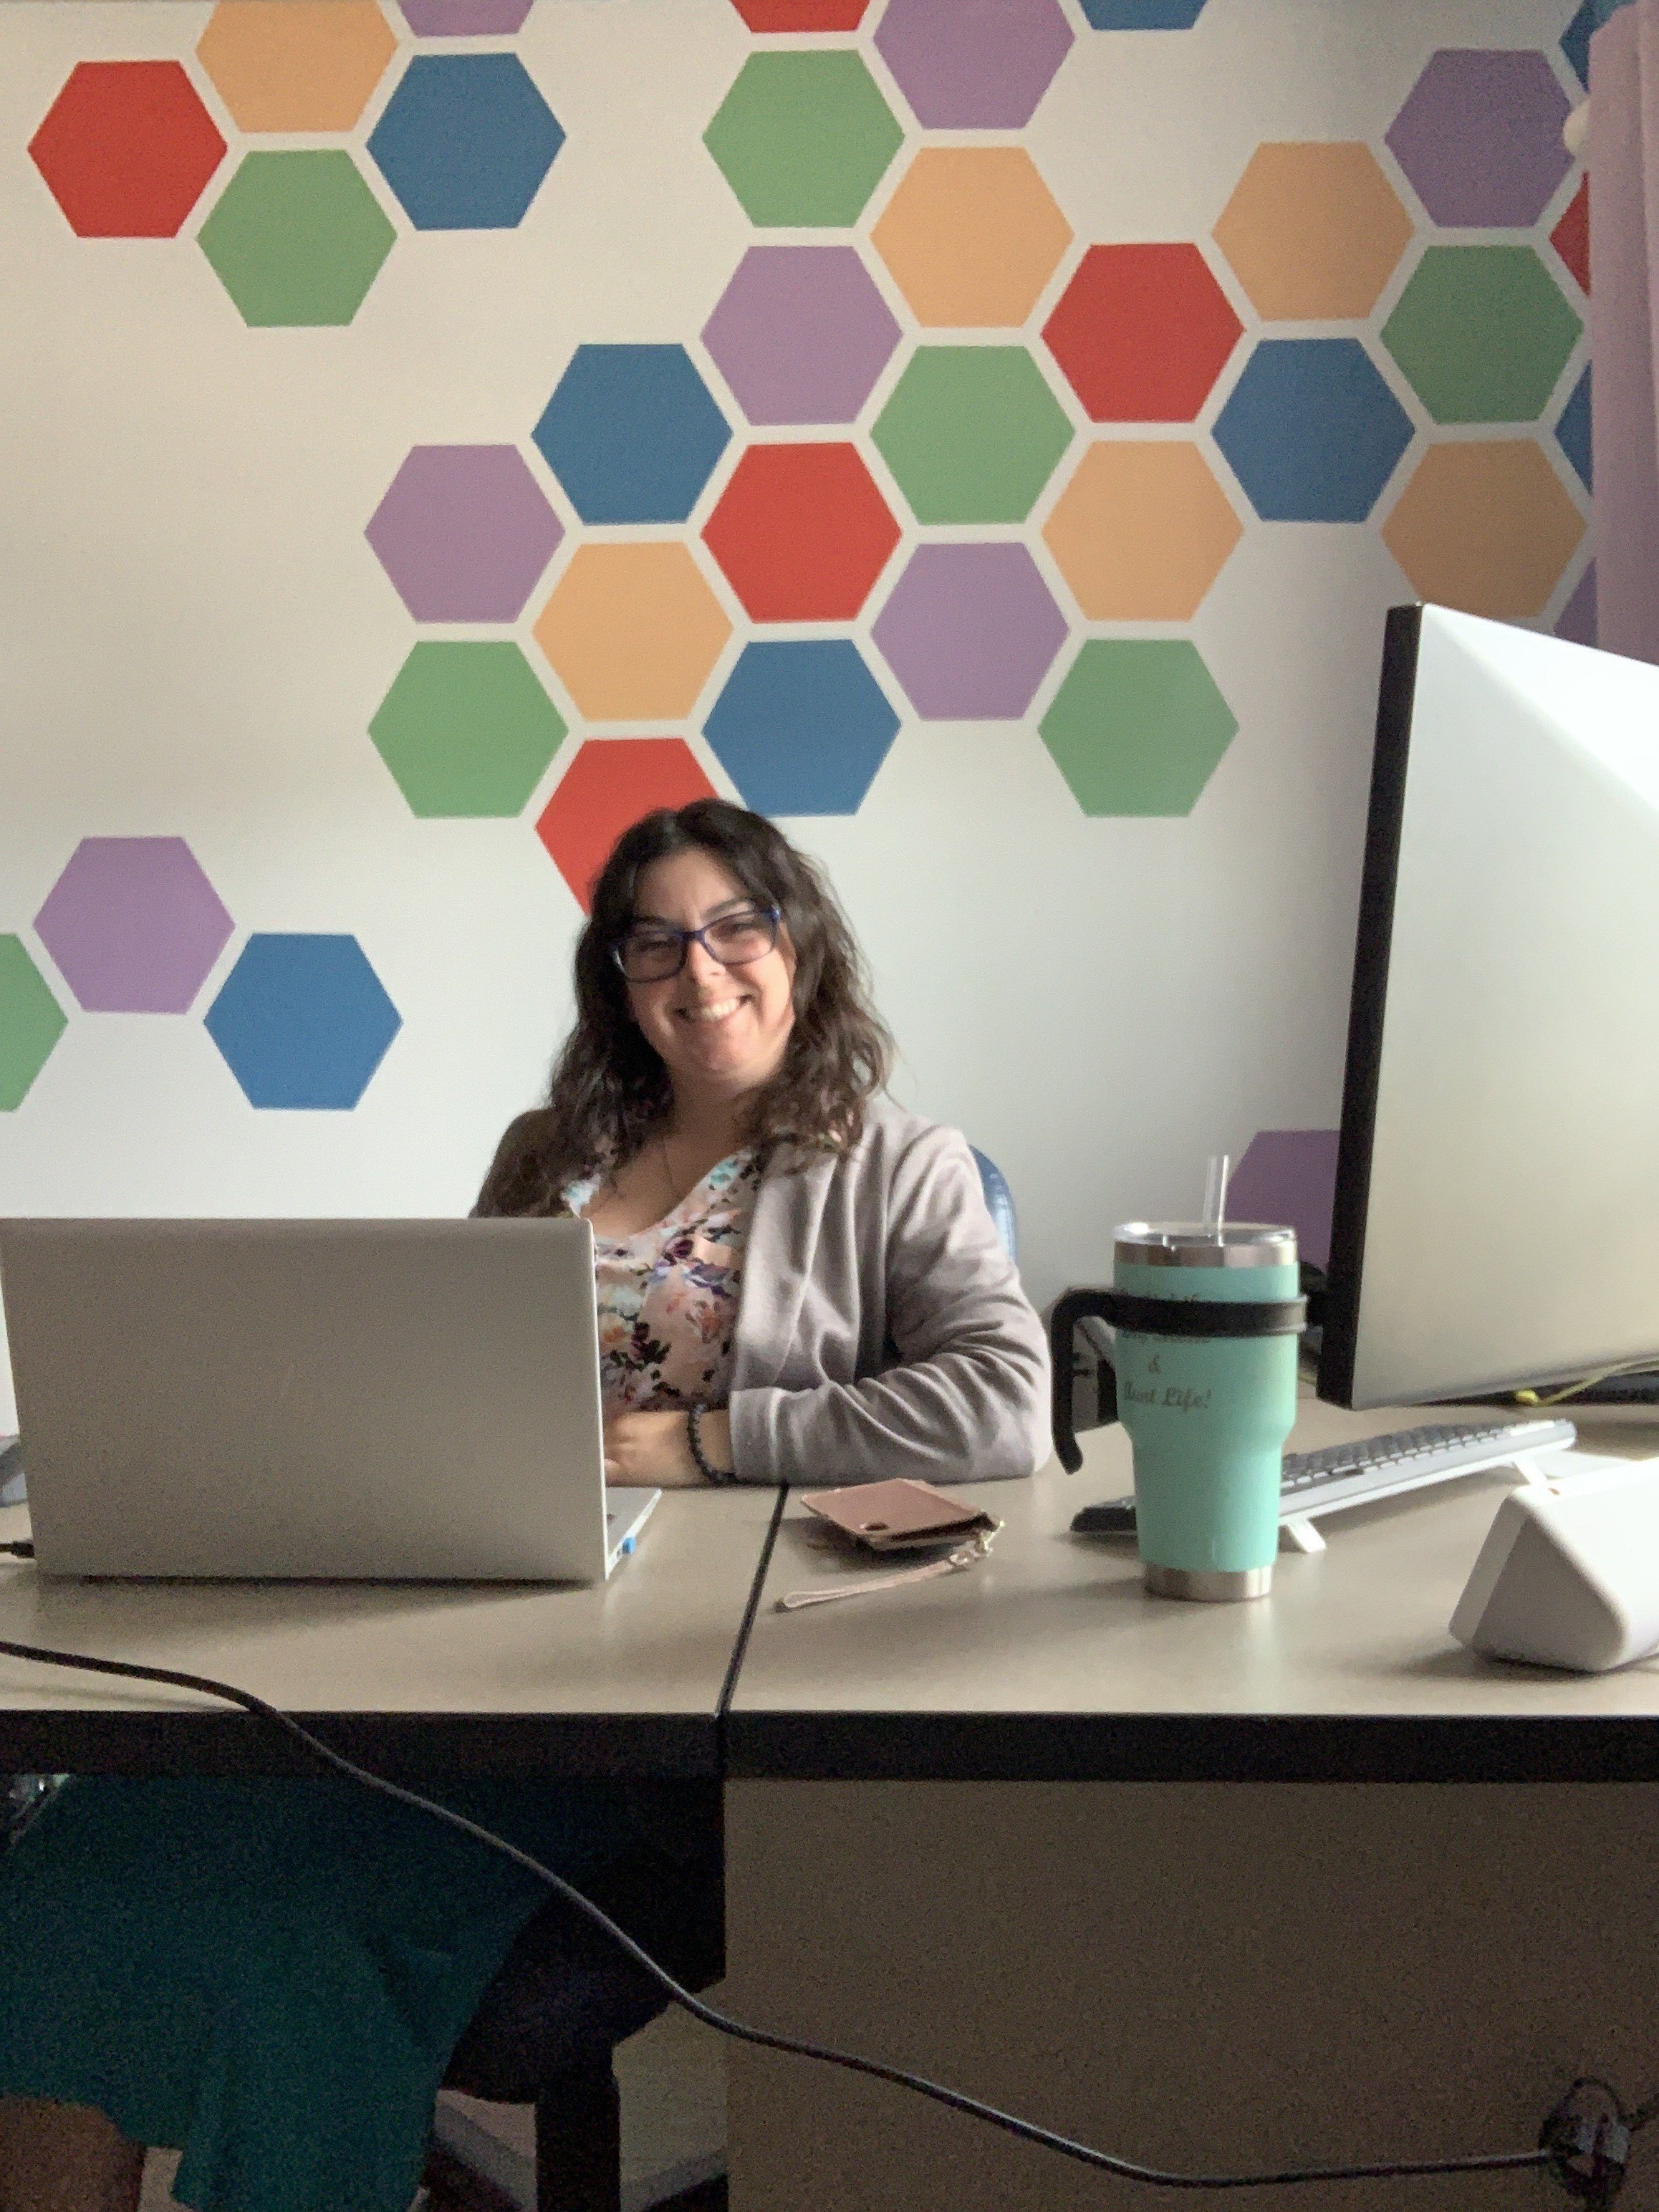
For this example, I had a different project than the one above, where I needed to apply a simple sharpening filter of a slightly blurry image to make it ready for inclusion in a social media post.
In my opinion, the Pica AI toolset output the best result, so that is the one I ended up going with. The only real negative is that I had to crop out the watermark, because I demoed the free version of the app. No big deal though - here is how it turned out:
Other areas where enhancement can be very useful are if you are trying to update an older image that is grainy to greater sharpness, or when up-scaling a smaller or lower resolution 72dpi RGB color file to a higher resolution 300dpi CMYK color file that can be used for printing. For very focused, task-specific functions, AI can certainly save you time.
Just remember that nothing is free, and even these solutions seek to tie users into their platforms by maintaining mechanical files in the cloud instead of locally, and charging much higher subscription fees for transferring materials from one user to another. Remember that you will still need to proof, tweak, and adjust until it gets to the final form to avoid any embarrassments that compromise quality.
Conclusion
Remember that AI for graphics is not an silver bullet for instructional designers. It builds on other skills, and the best use is in very specific points in an established workflow to save time performing tasks that are repetitive or low value. I encourage you to learn competent prompting, identify the right-fit tools for your needs, then practice and keep tabs on how much time they are saving you to determine the best use.
Written by Jonathan Flieder and published in 2025.
Subscribe to our newsletter today to automatically receive the next issue in your email inbox.
Related Articles For Further Reading


